P1: The traffic light
Categories:
The traffic light
What you will review in this project
In this project, we will review:
- Connection between the development board and the computer.
- Use of the BatSTEM Cloud development environment.
- Control of external LEDs from the development board.
- LED control blocks and wait blocks.
Prerequisites
This project applies the concepts learned in the lessons L1: My first project, L2: The LED diode and L3: The LED diode (2).
Instructions
Using everything we have learned in the previous lessons, we will build a traffic light with LED diodes. Our traffic light will have three colors: red, yellow, and green. We will use three LEDs, one of each color. You will need to place the three LEDs on the prototyping board along with any additional components you think necessary and develop a program that will make them light up in the following sequence:
- Green for 10 seconds.
- Yellow for 2 seconds.
- Red for 10 seconds.
Hints
First, think about what materials you will need and try to create a mental diagram of how you will connect them. Then, consider what types of blocks you will use to turn LEDs on and off and to wait for a set amount of time.
Check these hints only if you need to. Try it without looking first!
View Hints
Solution
Check the solution only if you have already finished or if you are unable to proceed! You will learn much more if you manage to complete the project without looking at the solution ahead of time.
View Solution
General Description
To build our traffic light, we will need to connect the three LEDs to the development board, each to a different GPIO pin. They must be connected along with a protection resistor, just as we did in lessons L2 and L3. Then, we will use the LED definition and control blocks, along with wait blocks, to manage them according to the proposed sequence.
You can choose any GPIO pins you prefer. For this solution, we have selected GPIO18 for the red LED, GPIO5 for the yellow LED, and GPIO4 for the green LED.
Materials
- Development board.
- Prototype board.
- USB connection cable.
- Red LED.
- Yellow LED.
- Green LED.
- 3x 100 Ohm resistors.
- Connection wires.
Circuit Diagram
The electronic diagram of the circuit to be built is shown in the following image.
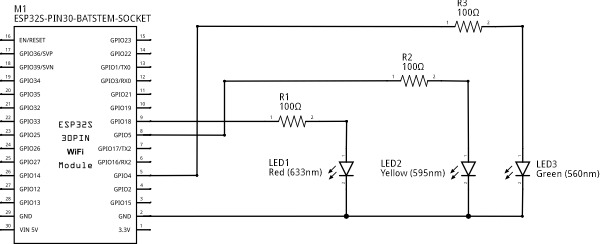
Electronic diagram of the traffic light
You can see that each LED has its own protection resistor. We will place the resistors between the anode of the LEDs and the corresponding GPIO pin. The cathode of the LEDs will be connected to GND.
Connection Diagram
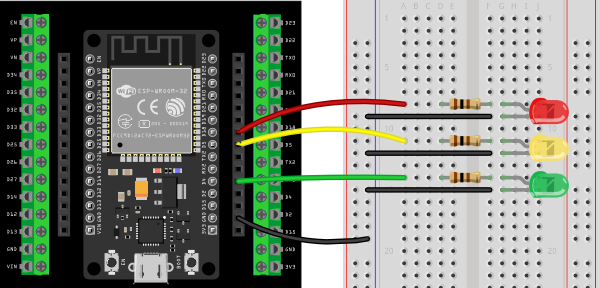
Component connections on the prototype board
Connect the components following the diagram. Pay attention to the following details:
- A wire connects the GND pin of the development board to the blue line of the prototyping board. The blue line will serve as our 0-volt reference or GND.
- The three colored wires (red, green, and yellow) connect to three different lines on the prototyping board. These lines will hold one terminal of the protection resistors.
- The other terminal of the resistors will be placed in lines of the other connection block. The anodes of the LEDs will be placed on those same lines.
- The cathodes of the LEDs will be connected via wires to the blue GND line.
Pay attention to the polarity of the LEDs! You can recall how to identify the anode and cathode of an LED by reviewing what you learned in Lesson 2.
Code
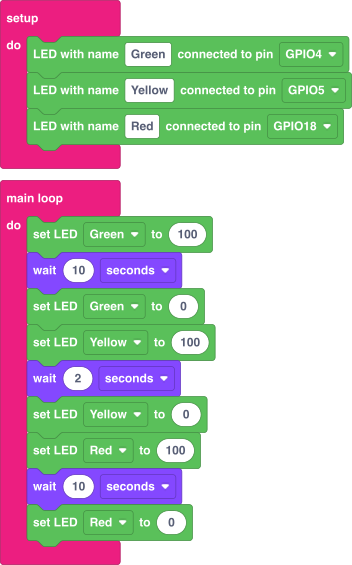
Traffic light program blocks
Build the program following the diagram. Pay attention to the following:
- In the setup block, we define the three LED-type devices, assign names to them, and specify which GPIO pin they are connected to. Make sure to specify the correct pin. If you need to recall what the setup block does, check Lesson 1.
- In the main loop, we add blocks to control the traffic light sequence. This sequence will be as follows:
- Turn on the green LED.
- Wait 10 seconds.
- Turn off the green LED and turn on the yellow LED.
- Wait 2 seconds.
- Turn off the yellow LED and turn on the red LED.
- Wait 10 seconds.
- Turn off the red LED.
- After the red LED turns off, the loop will run again from the beginning, turning on the green LED and restarting the sequence.
Press the Run button to compile and upload your program to the development board. If everything goes well, you will see your traffic light functioning.
Traffic light in action (speed 2x)